原创文章,转载请注明出处
https://qiedd.com/
0. 简介
买了Kimsufi的黑五独服后,没什么东西跑,32G的内存感觉不上zfs有点可惜,这玩意又有两块硬盘,因此决定上raidz,然而 Kimsufi 没有vnc , 因此掉进了很多坑
ZFS 会默认用一半的内存作为 ARC , 你可以自定义 ARC 的大小
Arch Wiki 上的说明:https://wiki.archlinux.org/title/ZFS#ZFS_is_using_too_much_RAM
环境
Kimsufi Server
Memory: 32G
CPU: Intel Xeon E5-1620 v2 (8) @ 3.900GHz
System : Debian 11 (Bullseye) (64bits)
1. 保存配置
在启动前我们需要保存一些配置
IPv6配置
默认 IPv6 配置在 /etc/network/interfaces 中
我们需要记住这几个就可以了
# control-alias eno1
iface eno1 inet6 static
    address 2001:**********::1/56
    dns-nameservers 2001:**********::1
    gateway 2001:********fff:ff:ff:ff:ff
2. 启动镜像
由于 ArchISO 默认不带密码,我们又没有 VNC,因此需要自定义镜像来给它添加密码,如果需要自定义,请参考上一篇文章
从 Grub 启动镜像
ssh密码默认为 qiedd.com
请注意替换下方的链接
如果 /boot 在独立的分区,请务必确认此分区是否能容纳安装镜像!(空余1G左右)
如果是其他服务商的机子,请确认内存是否足够,经测试 1G 内存是不够的,最低可能需要 2G!
请注意,使用 Grub 启动镜像会将其在内存中加载,请确认内存是否足够容纳下 ArchISO,并有足够空间启动内核!!
# 安装grub-imageboot
apt install grub-imageboot

# 创建一个目录用于存放镜像
mkdir /boot/images

# 进入目录
cd /boot/images

# 下载Archiso
wget https://dl.qiedd.com/Linux/custom/user/archlinux-2021.12.07-x86_64.iso

# 更新grub
update-grub2

*** 示例 ***
root@VM-20-12-debian:~# update-grub
Generating grub configuration file ...
Found linux image: /boot/vmlinuz-4.19.0-11-amd64
Found initrd image: /boot/initrd.img-4.19.0-11-amd64
Found memdisk: /boot/memdisk
Found iso image: /boot/images/archlinux-2021.12.07-x86_64.iso
done

# 这里我们的iso在第三项,因此需要调整下grub的默认启动项
# 0是第一项
vim /etc/default/grub

*** 示例 ***
GRUB_DEFAULT=2

# 更新grub
update-grub2

# 重启
reboot
3. Arch Linux 安装
一、硬盘分区
现在,我们就在 ArchISO 里了,接下来就要开始安装了
我们看下硬盘,应该会有一个 /dev/md127 的 Raid 1 盘
首先我们需要把这个软 raid 解开,然后才能对其重新分区
# disable soft raid 1
mdadm -S /dev/md127
由于 Kimsufi 的启动模式为 BIOS(Legacy Boot),因此我们要分一个 1M 的 BIOS boot partition
并分出一个 1G 的分区用于 Grub 的启动分区,另外由于 Raidz 总是取最小的硬盘作为所有 vdev 的最大容量,因此我们两个盘都分一样就好了
请注意分区的类型
这里用 /dev/sda 举个例子,/dev/sdb 同理
# 这里使用了fdisk
fdisk /dev/sda

# 创建一个gpt表
Command (m for help): g

# 创建BIOS boot分区
Command (m for help): n
Partition number (1-128, default 1): 直接回车
First sector (2048-3907029134, default 2048): 直接回车
Last sector, +/-sectors or +/-size{K,M,G,T,P} (2048-3907029134, default 3907029134): +1M

# 更改分区类型
Command (m for help): t
Selected partition 1
Partition type or alias (type L to list all): 4
Changed type of partition 'Linux filesystem' to 'BIOS boot'.

# 创建Grub分区
Command (m for help): n
Partition number (2-128, default 2): 直接回车
First sector (4096-3907029134, default 4096): 直接回车
Last sector, +/-sectors or +/-size{K,M,G,T,P} (4096-3907029134, default 3907029134): +1G

# 创建系统分区
Command (m for help): n
Partition number (3-128, default 3): 直接回车
First sector (2101248-3907029134, default 2101248): 直接回车
Last sector, +/-sectors or +/-size{K,M,G,T,P} (2101248-3907029134, default 3907029134): 直接回车

# 保存配置
Command (m for help): w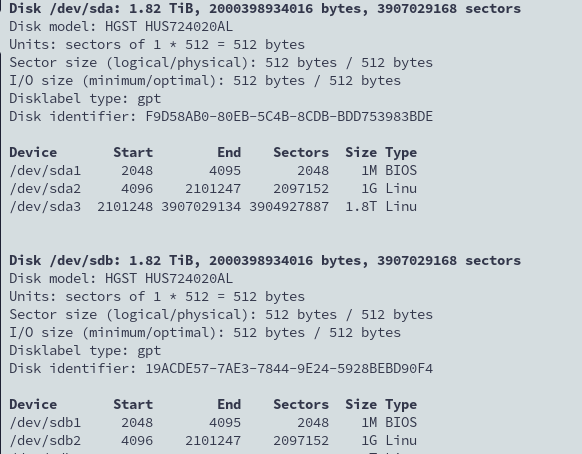
二、安装ZFS支持
https://github.com/eoli3n/archiso-zfs
由于 ArchISO 默认没有 ZFS 模块,我们需要手动安装
curl -s https://raw.githubusercontent.com/eoli3n/archiso-zfs/master/init | bash -x
三、创建 Raidz
如果你有其他硬盘的话,请调整设置
这里我选择了 lz4 压缩,如果你有其他需求,可以选择其他压缩方式
zpool create -f -o ashift=12 -m /mnt zroot \
             -O acltype=posixacl       \
             -O relatime=on            \
             -O xattr=sa               \
             -O dnodesize=legacy       \
             -O normalization=formD    \
             -O mountpoint=none        \
             -O canmount=off           \
             -O devices=off            \
             -O compression=lz4 \
              raidz \
                  /dev/sda3 \
                  /dev/sdb3
创建 datasets
zfs create -o mountpoint=none zroot/data
zfs create -o mountpoint=none zroot/ROOT
zfs create -o mountpoint=/ -o canmount=noauto zroot/ROOT/default
zfs create -o mountpoint=/home zroot/data/home
看看 zpool 是否能正常工作
zpool export zroot
zpool import zroot -R /mnt
挂载 zpool 中的分区
zfs mount zroot/ROOT/default
zfs mount -a
设置 zpool 中的 root 分区
zpool set bootfs=zroot/ROOT/default zroot

# 如果说没有这个分区,那么就去创建一个
cp /etc/zfs/zpool.cache /mnt/etc/zfs/zpool.cache

zpool set cachefile=/etc/zfs/zpool.cache zroot
最后格式化一下我们的启动分区
mkfs.ext4 /dev/sda2
mkfs.ext4 /dev/sdb2
四、安装Arch Linux
首先我们需要挂载一下 /boot
mkdir /mnt/boot
mount /dev/sda2 /mnt/boot
如果是国内用户,建议换源
vim /etc/pacman.d/mirrorlist
*** 国内镜像源 ***
Server = https://mirrors.ustc.edu.cn/archlinux/$repo/os/$arch
Server = https://mirrors.cloud.tencent.com/archlinux/$repo/os/$arch

# 腾讯云内网
Server = http://mirrors.tencentyun.com/archlinux/$repo/os/$arch
这里我选择了用 lts 内核,防止内核更新太快导致挂掉
# 可能需要更新key
pacman-key --init && pacman-key --populate archlinux

# 安装必要软件包
pacstrap /mnt base linux-lts linux-lts-headers linux-firmware base-devel vim os-prober intel-ucode openssh wget grub networkmanager archlinux-keyring zfs-dkms
如果是amd的机子,需要将 intel-ucode 换成 amd-ucode
设置 fstab
genfstab -U /mnt >> /mnt/etc/fstab
cat /mnt/etc/fstab
chroot-root 并修改 fstab
arch-chroot /mnt
设置时区
ln -sf /usr/share/zoneinfo/Asia/Shanghai /etc/localtime
hwclock --systohc
date
设置 locale
vim /etc/locale.gen
*** 加在最前面 ***
en_US.UTF-8 UTF-8
zh_CN.UTF-8 UTF-8
zh_TW.UTF-8 UTF-8

# 应用配置
locale-gen

# 设置默认locale
vim /etc/locale.conf
*** 示例 ***
LANG=en_US.UTF-8
设置 HOOKS,让内核知道你用了 ZFS
vim /etc/mkinitcpio.conf
*** 找到HOOKS ***
HOOKS=(base udev autodetect modconf block zfs filesystems keyboard fsck)

# 应用配置
mkinitcpio -P
安装配置 Grub
grub-install /dev/sda
grub-mkconfig -o /boot/grub/grub.cfg
五、安装完后的配置
ZFS 配置
# 设置zpool缓存
zpool set cachefile=/etc/zfs/zpool.cache zroot

# 让zfs服务在开机时自启动
systemctl enable zfs.target
systemctl enable zfs-import-cache
systemctl enable zfs-mount
systemctl enable zfs-import.target
systemctl enable sshd
systemctl enable NetworkManager
密码和 SSH 设置
# 设置root密码
passwd

# 允许SSH root登录
vim /etc/ssh/sshd_config
*** 示例 ***
PermitRootLogin yes
退出并重启
# 退出chroot
exit

# 取消挂载
umount -R /mnt
zfs umount -a
zpool export zroot

# 同步
sync

# 重启
reboot
IPv6 配置
由于 IPv6 是静态的,我们需要手动恢复,这时候我们保存的 IPv6 配置就有用了
现在网络由 NetworkManager 接管,因此我们可以使用 nmcli 来配置
请将 IPv6 信息换成你自己的
# 查看网卡信息,并复制网卡的UUID
nmcli con

# 编辑网卡信息
nmcli con edit 你的网卡的UUID

# 设置IPv6地址
set ipv6.addresses 2001:******::1/56

# 设置IPv6网关
set ipv6.gateway 2001:******fff:ff:ff:ff:ff

# 设置IPv6路由
set ipv6.routes 2001:******fff:ff:ff:ff:ff

# 保存信息
save

# 退出
q

# 重启服务器
reboot

# 测试
ping -6 google.com
重启后配置
# 添加archlinuxcn源和archzfs源
vim /etc/pacman.conf

[archlinuxcn]
Server = https://repo.archlinuxcn.org/$arch

[archzfs]
Server = http://archzfs.com/$repo/x86_64

# 可选镜像源
# archlinuxcn
# Server = https://mirrors.cloud.tencent.com/archlinuxcn/$arch
# Server = https://mirrors.ustc.edu.cn/archlinuxcn/$arch
# Server = https://repo.archlinuxcn.org/$arch

# archzfs
# Origin Server - France
# Server = http://archzfs.com/$repo/x86_64
# Mirror - Germany
# Server = http://mirror.sum7.eu/archlinux/archzfs/$repo/x86_64
# Mirror - Germany
# Server = https://mirror.biocrafting.net/archlinux/archzfs/$repo/x86_64
# Mirror - India
# Server = https://mirror.in.themindsmaze.com/archzfs/$repo/x86_64
# Mirror - US
# Server = https://zxcvfdsa.com/archzfs/$repo/$arch

# 安装key
pacman-key -r DDF7DB817396A49B2A2723F7403BD972F75D9D76
pacman-key --lsign-key DDF7DB817396A49B2A2723F7403BD972F75D9D76
pacman -Syu archlinuxcn-keyring

# 安装yay
sudo pacman -S yay
性能测试
curl -sL yabs.sh | bash
# ## ## ## ## ## ## ## ## ## ## ## ## ## ## ## ## ## #
#              Yet-Another-Bench-Script              #
#                     v2021-10-09                    #
# https://github.com/masonr/yet-another-bench-script #
# ## ## ## ## ## ## ## ## ## ## ## ## ## ## ## ## ## #

Sat Nov 27 11:05:27 AM CST 2021

Basic System Information:
---------------------------------
Processor  : Intel(R) Xeon(R) CPU E5-1620 v2 3.70GHz
CPU cores  : 8 @ 1500.641 MHz
AES-NI     : Enabled
VM-x/AMD-V : Enabled
RAM        : 31.3 GiB
Swap       : 0.0 KiB
Disk       : 973.4 MiB

fio Disk Speed Tests (Mixed R/W 50/50):
---------------------------------
Block Size | 4k            (IOPS) | 64k           (IOPS)
  ------   | ---            ----  | ----           ----
Read       | 22.57 MB/s    (5.6k) | 229.29 MB/s   (3.5k)
Write      | 22.58 MB/s    (5.6k) | 230.50 MB/s   (3.6k)
Total      | 45.15 MB/s   (11.2k) | 459.80 MB/s   (7.1k)
           |                      |
Block Size | 512k          (IOPS) | 1m            (IOPS)
  ------   | ---            ----  | ----           ----
Read       | 635.61 MB/s   (1.2k) | 548.68 MB/s    (535)
Write      | 669.39 MB/s   (1.3k) | 585.22 MB/s    (571)
Total      | 1.30 GB/s     (2.5k) | 1.13 GB/s     (1.1k)

iperf3 Network Speed Tests (IPv4):
---------------------------------
Provider        | Location (Link)           | Send Speed      | Recv Speed
                |                           |                 |
Clouvider       | London, UK (10G)          | 99.1 Mbits/sec  | 941 Mbits/sec
Online.net      | Paris, FR (10G)           | 99.1 Mbits/sec  | 941 Mbits/sec
WorldStream     | The Netherlands (10G)     | 99.0 Mbits/sec  | 940 Mbits/sec
WebHorizon      | Singapore (1G)            | 88.2 Mbits/sec  | 639 Mbits/sec
Clouvider       | NYC, NY, US (10G)         | 95.6 Mbits/sec  | 901 Mbits/sec
Velocity Online | Tallahassee, FL, US (10G) | 91.5 Mbits/sec  | 869 Mbits/sec
Clouvider       | Los Angeles, CA, US (10G) | 92.0 Mbits/sec  | 722 Mbits/sec
Iveloz Telecom  | Sao Paulo, BR (2G)        | 84.6 Mbits/sec  | 643 Mbits/sec

iperf3 Network Speed Tests (IPv6):
---------------------------------
Provider        | Location (Link)           | Send Speed      | Recv Speed
                |                           |                 |
Clouvider       | London, UK (10G)          | 99.8 Mbits/sec  | 928 Mbits/sec
Online.net      | Paris, FR (10G)           | 97.7 Mbits/sec  | 928 Mbits/sec
WorldStream     | The Netherlands (10G)     | busy            | busy
WebHorizon      | Singapore (1G)            | 83.9 Mbits/sec  | 443 Mbits/sec
Clouvider       | NYC, NY, US (10G)         | 94.2 Mbits/sec  | 889 Mbits/sec
Clouvider       | Los Angeles, CA, US (10G) | 89.8 Mbits/sec  | 609 Mbits/sec

Geekbench 5 Benchmark Test:
---------------------------------
Test            | Value
                |
Single Core     | 861
Multi Core | 3536 
0 条评论